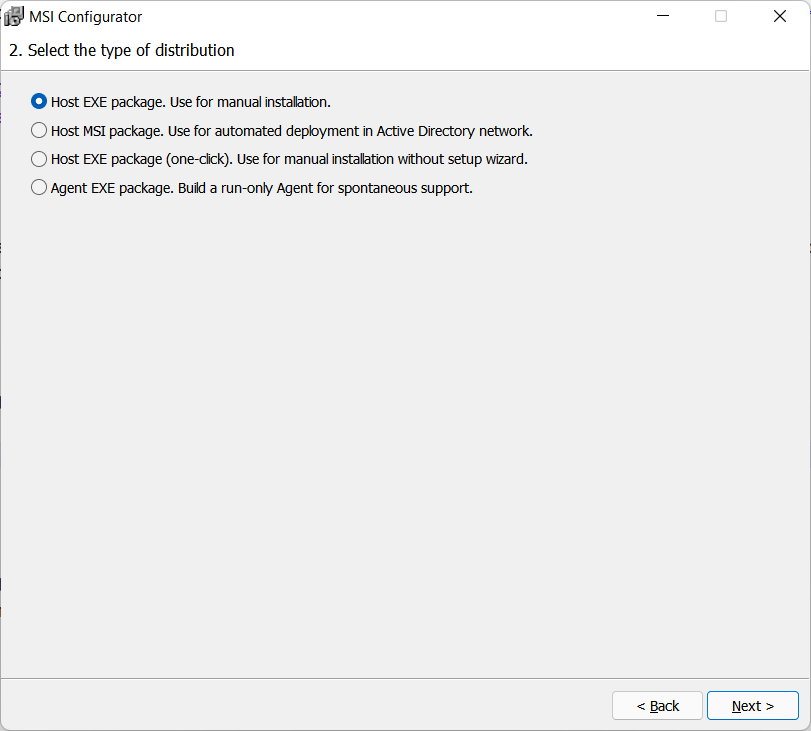
Agent Package
Before you start:
- Download and install the latest version of Viewer on the computer where you are going to run the configuration process.
- If you already have the Host installed and running on the Viewer PC — stop Host (right click on the Host tray icon and select Stop Host).
Where to use
The "Agent" configuration option allows you to customize Agent. You can add your logo and welcome text, and pre-configure Agent settings.
Sample goals
For the purposes of this tutorial, we will assume that you have the following goals when building an Agent package:
- Goal 1 Enable Internet-ID connection on Agent.
- Goal 2 Configure Agent to send the Internet-ID access credentials to you via email.
- Goal 3 Configure Agent to show a disclaimer message at startup. For example, if you are providing remote support services you can display your rate card before a remote session starts.
- Goal 4 Customize Agent window with your company logo and welcome text.
Let’s see how you can configure the program to achieve these goals.
Configuration process
Run Viewer as an administrator and select Tools ➝ MSI Configurator:

Step 1: Specify how the configuration process should proceed
Select Online configurator and click Next:

Important!
In this tutorial we select Online configurator at step 1. With this option your choices are uploaded to our server and a final output file is downloaded. The output file is signed with our digital signature. The Online configurator option is recommended in most cases.
Step 2: Select the type of distribution
Select Agent package and click Next.

Step 3: Advanced options
"Internet-ID" tab
On the "Internet-ID" tab do the following:
- Select the following checkboxes (Goal 1):
- Set or update Internet-ID connection settings
- Generate a new Internet-ID code
- Send Internet-ID to email
- Select Automatically generate Host password. Each Agent will have a unique randomly generated access password.
- Select Use default (public) Internet-ID server. Each Agent will use our company's Internet-ID server in the cloud to broker a remote connection.
Configuring SMTP
In this example we'll be using a free Gmail account without two-factor authentication. Adding SMTP server information will let Agent send an email with access credentials to the email address that you specify (Goal 2).
Important!
If your email account uses 2-factor authentication, you will need to create an "application password". Please, refer to your account documentation for more information. Example: How to sign in using app passwords in Gmail.
- Click Configure SMTP...:
- Enter your SMTP server account details and access credentials. Modify the message template if necessary and click Send test email:
- If you entered your email account credentials correctly, a "successful" message will appear:
- You should receive a test message to your "Destination email" address:
- In the Configure SMTP window click OK. Read the disclaimer message and click Yes if you agree (and No if you do not agree):
- Click Next to proceed to the next configuration step:
"Other" tab
Switch to the Other tab and check Show disclaimer at startup (Goal 3). Enter the text of the disclaimer in the field.

"Integrate your logo" tab
Switch to the Integrate your logo tab and add your logo and welcome text in the appropriate fields (Goal 4).

Click Preview to see how the customized portion of the Agent window will look like after the customization. Close the preview window.

In the MSI Configurator window click Next.
Step 4: Settings update
In this step you can pre-configure Host/Agent settings. Neither of our goals for this tutorial requires Host/Agent settings configuration, so we can skip this step. Select Skip Host settings configuration and click Finish.

The configuration process will begin:

At the end of the configuration process the output file will download:

You will be prompted to save the output file. Choose a destination and click Save:

Configuration has been finished successfully. Click OK to close the configuration window.

Running Agent
Let's see what will happen when you or your customer run the configured Agent file on a remote computer.
Copy the Agent file onto the target computer and double click the file to run it:

In the User Account Control (UAC) prompt click Yes:

You may also need to click Allow access in Windows Firewall message:

A disclaimer window will be shown with the message that you added during configuration (Goal 3). Click Accept:

An Agent window with your logo and welcome text will appear. The Ready for connection checkmark means that Agent has successfully connected to an Internet-ID server and is waiting for a remote session to start.

Adding a new connection to Viewer
Since you have enabled Send Internet-ID to email option (Goal 1) and also chose to generate and send an access password (Goal 2) you should receive an encrypted email with access credentials. To add a new connection to your Viewer please follow the steps described here.